top of page

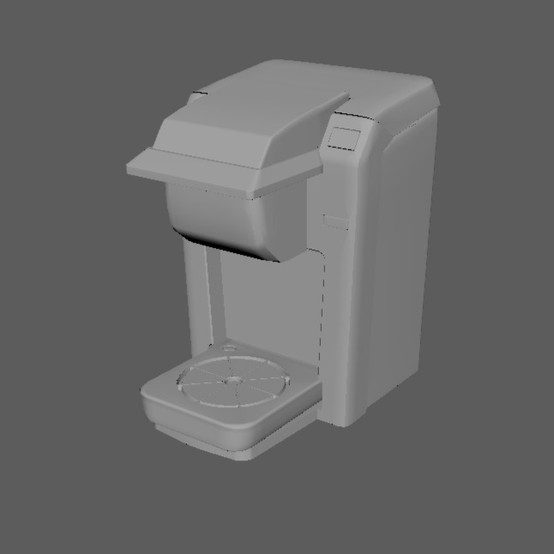
Unfortunately, the render farm has been throwing a tantrum for the greater part of this week, so I didn't get as far with blocking out my scene as I wanted to as I spent most of my time between last class and now using every computer I could to get a rough lighting render out, but I did decide to get a rough fluid simulation started for the final scene where the Keurig starts up. I know it will likely be a steep learning curve for me and wanted to give myself ample time to problem solve where trouble arises since the Keurig brewing is the last shot and probably the most important one of my project. I've also started some of the RBD simulations in the beginning. I'm generally enjoying piecing this together by starting with rough keyframes and then slowly phasing them out with the simulations as I get to each piece. As the simulations get finalized in the following classes, I will also need to adjust any UVs on models before caching them for final texture/render.


  • Elizabeth House
  • Jan 21, 2022
  • 4 min read

This exercise was intended to explore the similarities and differences between using VEX snippets within a point wrangle and point VOPs within Houdini. To exemplify this, I made a seashell generator based on a formula for a helico spiral that Professor Fowler provided. She also provided a code block for VEX in which I interpreted into VOPs. The goal was to achieve an identical shell.

ree
ree

Both methods resulted in slider controls to easily create different types of shells by adjusting the parameters of the spiral. When parameters in both my VOPs and VEX containers matched values, the result was an identical shell.

ree
ree

From here, I started experimenting with controls to try and replicate different types of shells.

I knew after achieving this that I wanted to take things a step further and create a miniature environment based on a jar of shells that I have in my room. I already had knowledge about how to run a rigid body simulation on the shells to get randomization and a natural stacked effect in the jar from a previous project, so I knew I would run into too much trouble. The main thing I wanted to do was use Redshift since I had never used it before.


ree

ree

ree

My workflow (pictured above) for doing this was essentially giving each shell its own integer variant (shellVar) and copying them to points using a random function in a point wrangle and fitting the randomization range to only include the integers of the shell variants, in this case, fitting the range to be between zero and six so that every point would be assigned a shell. I also randomized the orientation of the shells and the scale (I fit the range of the scale as well so the size variation of the shells would not be so drastic). I then scattered points onto a box and used a points from volume node to achieve a more organic placement, and used the resulting point cloud to copy the shell geometry onto. This node has seed and point separation parameters which come in handy when using RBDs. In the copy to points node, I made sure to check on the piece attribute and match the name to shellVar to get the randomization to work, then I ran my sim.


ree

Once I was happy with the simulation, I cached it out using a file cache node. The updated file cache node in Houdini 19 has options for incrementing/variations and automatically loads from disk once saved, which I found to be quite useful when updating or re-running my simulation.


ree

Above is the result after caching out my simulation. Next was textures. I looked at several references both in person and online of seashells and what they looked like and decided to digitally paint my own tileable diffuse maps, which I did in Photoshop. I made six different variations.


I then brought these maps back into Houdini, and since I had UV’d my seashell models before caching my simulation, I was easily able to copy the textures onto the shells. The randomization, however, proved to be a challenge. I knew how to randomize textures using a string value in a material node. However, there was no parameter linked to the diffuse color in Redshift like there was in Mantra, which is what I was used to. Although it took a bit of time and research, I finally realized I could add a parameter within the mat network of my Redshift shader that linked an image file. I could name that parameter anything (I chose diffuse color) and reference it in my material node at the SOP level.


ree

ree

The original randomization of the textures resulted in a lot of neighboring shells having the same texture, so I wanted to change the seed. I didn’t quite know how to implement a parameter control inside a material node, so I just added an arbitrary value to the primitive number attribute inside the random function until I got a result I liked (in this case, 14.2).


Building the rest of the environment, I got a model online (cgtrader.com) for a windowsill and nightstand and wanted to use some bump maps on them. I had the shader network linked properly using an image file and displacement node and then connecting them to the displacement notch in the Redshift shader output, but still wasn’t seeing results. This is because displacement maps must be turned on in a specific Redshift tab at the top level geometry container. When I was working, there was no specific tab for Redshift, so I had to go to the Redshift dropdown menu at the top of the Houdini interface and click “Add OBJ Parameters” while the container was selected. I also had to do this with any camera node I used; the only different was clicking “Add Camera Parameters” instead.


From there, I decided to place one of each of my five shells out on the nightstand and slightly enlarge them so in the final render, the details of the ridges and the diffuse maps were a little more noticeable. Then, I set up my render cam.

ree

One thing I really enjoyed about Redshift was the depth of field parameters on the camera plug in. Personally, I found that not using Houdini’s focus/fstop (checkbox) and using Reshift’s controls provided better results than Mantra/was more user friendly when defining DOF.


ree

This was my final result! Using Redshift was definitely a journey, but even with high samples for glass and calculating the bump/displacement of the wood textures, this particular photo finished rendering in less than a minute, which is incredibly fast when compared to some past renders I’ve done in other engines. I also enjoyed getting back into VEX and finding new ways to accomplish the same task. If I were to revisit this, I would love to spend more time working on more specific maps for the shell roughness and bump maps, as well as continue experimenting with the shell geometry parameters to get even more types of shells.

Since there was a long weekend, I wanted to use that time to finish up the Keurig and start previsualization for my opening scene. Below are some screencaps of some of the models.

Bringing the models into Houdini immediately brought up questions, namely how to keep mesh 'groups' and separate pieces of geometry separated instead of importing as one mesh. Thankfully, Houdini was able to recognize the different pieces of mesh as primitive groups, which are easily accessible through group tabs once defined.

ree

The first thing I wanted to tackle was the animation of the clock hands, since I envisioned a close up of the clock striking 7AM and starting the chain reaction. I knew I could keyframe the hands or do a simple procedural "by frame" animation in a rotation transform, but I had a method of procedurally animating the hands that would start and stop and enhance the ticking effect of the alarm in a loop.

ree

The rate pictured in the screencap controls the number of degrees in which the hand

rotates around the pivot point (the rate for the second hand is six since there are 60 seconds in a minute and 360 degrees in a circle; the negative sign is just so the hand will rotate clockwise). The static and rising variables determine how many frames the hand will rotate and pause, respectively, so I set those both at 12 (added together is 24 frames, which aligns with a true second of animation). Once I was able to get that functional, I used the same methods on the minute and hour hand, slightly adjusting the rates and static/rising to go slower and move in smaller degree increments. I also adjusted the position of the hands to be closer to 7AM in a separate transform node before applying the procedural rotation. I was able to affect only the hands in the group node since they were separate pieces of mesh in my Maya file.


ree

Once the hands all matched, I moved on to the shaking of the

bells, ringer, and alarm as a whole. Since the ringer cannot constantly be ticking like the hands of the clock, I couldn't do a looped animation. My solution for this was to have the ringer be static, but to feed in a transform node to the same source file and use a switch node to toggle between the animated and the static based on the frame in which all the hands hit 7AM. For the ringer animation, I used a sine function and multiplied by some large numbers to get a (very) fast swinging effect of the ringer between the bells. I then used an if statement to trigger the switch node and applied the same techniques to the alarm

as a whole and the bells, utilizing both separate transform nodes and primitive groups.

ree

Just to finish up the current shot, I quickly keyframed the position of the shaking clock so that it falls off the nightstand it is on. I added a quick camera move and some extremely preliminary lighting and here is my rough animatic for my opening scene.


Of course this is a very rough block out of the scene with minimal lighting, set dressing, and so on, but I'm happy with the current state. Ideally in the beginning shot there is some visible atmosphere and ambient noise for sound design (birds chirping, leaves rustling, etc.), so it's not as 'sit and wait' feeling on the opening frame. The next step in the process is to piece together the next parts of the machine.


bottom of page