top of page
  • Elizabeth House
  • Jun 2, 2022
  • 1 min read

This week, our team was focused mainly on getting the small details into our final edit, such as the headlights turning on and further color grading the end logo so that the Chevy logo itself stood out more. We also were able to get some sound design into the final edit, which was really exciting. Here's the final product.

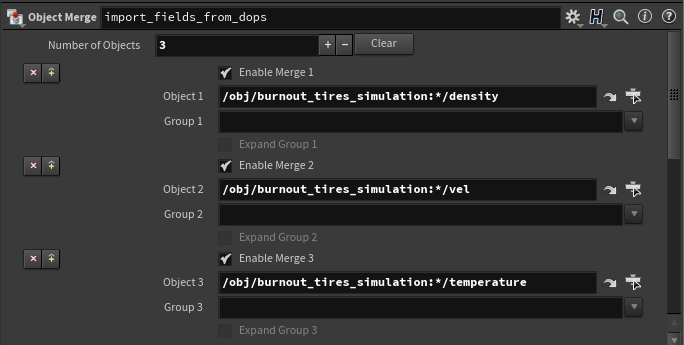
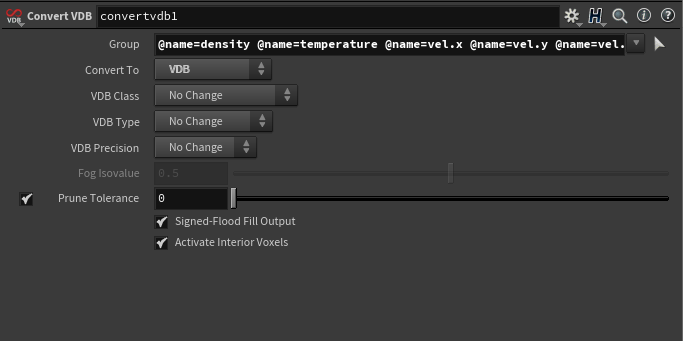
In this final cut, I was responsible for the smoke/exhaust FX on shots 01 and 02. My teammate Jie Chen was responsible for all of the FX in shot 05. My teammate Camilo Gutierrez was responsible for compositing all the assets as well as our cinematographer for our back plates. My teammate Eaza Shukla was responsible for the look development of the car and the overall shot lighting. Also involved with this project was Mason Smigel, who rigged and animated the Camaro for our team, as well as Daniel Vidal and Esteban Benavides, who both lent their talent to sound design. You can find breakdowns for the work of the main Team Future group on their respective blogs (Jie: here Camilo: here Eaza: here). Below is a quick breakdown of the FX I did for shots 01 and 02.


Overall I learned so much this quarter and it was so nice to continually have feedback from industry professionals as well as enhance upon team building and communication skills. I think our team is extremely satisfied with our final result.

  • Elizabeth House
  • May 3, 2022
  • 2 min read

This week I was focused on getting more iterations of the smoke/exhaust for shots 1 and 2, mainly getting critique from the mentors implemented in shot 1 and correctly setting up the render layers for shot 2 so the exhaust would show up better in post.

Here's a flipbook of the latest iteration inside Houdini. I think that the exhaust in the wheel well is a lot better than last week, however I think the behavior of the smoke still feels too wispy as it comes off the back of the car, so I need to experiment more in the coming week with noise in the disturbance/turbulence field (pulse and block size, amplitude, roughness, etc. in the pyro solver). This week I did add some fans on the back size of the car as well, as I saw that Deja has used that technique and gotten good results, so that might also help with the overall behavior.


Here are some videos I've been using as reference:


After troubleshooting with Eaza and Camilo we were able to get a render with the exhaust looking a little bit whiter/grey instead of the reddish-brown or black we were getting beforehand. Now that the render layers are properly set up, the FX can be color graded separately without affecting anything else in the scene. However, this color grade in particular reveals a lot of problems. With shot 010 the exhaust seems way too dense, and the attribute transfer radius on the ground is clearly visible here. There also is a mixing effect going on where the burnout trails look very smoke-like, while the burnout smoke around the tires still looks really dark, so this will need adjusting. Hopefully the solutions are as straightforward as tweaking the AiStandardVolume shader parameters. I also think there's some strange behavior right before the car takes off on the table; it feels like the smoke should almost wrap around the table instead of moving straight out. Right now, I am using a simple grid as the ground plane for the collisions, so I think this coming week I will also try to add some proxy geometry that aligns with the table in our scene and see if that affects the smoke's behavior at all.


Now that the exhaust is visible in shot 020, I would like to adjust the behavior. I'm in a limbo state with the effect right now of it either being too "poofy" in appearance or too erratic and choppy. Right now, I am using a particle system that emits particles from the exhaust pipes as the source for the pyro, so maybe the approach needs to change for this in order to achieve the look we want.


  • Elizabeth House
  • Apr 26, 2022
  • 6 min read

This week I was responsible for corresponding between our animator Mason and getting those files formatted and transferred to fit our pipeline, as well as getting a working FX to look dev pipeline and continuing FX iterations.


Our rigging artist and animator Mason is fantastic and was able to get us a first pass pretty quickly into the week. Extracting the data from this animation for Jie and I to use in Houdini was as simple as exporting the car mesh as an alembic file from Maya.

As of Sunday, after implementing some critique from our team, Mason had a second pass and would love any feedback to address in the third pass.


For the FX pipeline, Jie and I discussed our potential methods for how to best transfer FX to Camilo for compositing. We decided that rendering within Houdini with Mantra as our render engine would be adequate because of its intricate shaders for pyro FX as well as the volume light, which creates a light source from a volume that is a lot stronger than an emissive shader. So, early on in the week I set up individual shot files with the most current HDRis, corresponding locked camera tracks (making sure to include the aligned ground plane as part of the .fbx export) and animation alembic files just so there was consistency between Jie and I's FX layouts. Then, I began developing the Houdini equivalent of render layers in one of my FX files,


Getting the FX by itself was as simple as creating a Mantra render node and declaring everything in the scene besides the effect as a phantom object. For the shadow pass, I set up a separate Mantra node, this time, declaring the car as an excluded object and the effect as a phantom object. Then, I assigned a Mantra shadow matte shader to the ground plane that was imported with the camera FBX.


The big concern with rendering inside Mantra was getting the reflections of any FX to show up on the car. Since the car animation was already imported, Eaza and I developed a makeshift technique of getting just the reflection information by assigning the car an all-black shader with the reflectiveness turned all the way up and no specular or diffuse roughness. Although this worked, I was able to see all the reflections from the HDRi in the surface along with the FX reflections. Since the car wasn't needed in any render passes except for the reflection, I made a light mask on the car so that the HDRi wouldn't affect it. This allowed the reflections to show on the car. In a separate Mantra render node, I declared the smoke to be a phantom object and excluded the ground plane. For good measure, I also added some basic AOVs in my render so that during the compositing process the specular information on the car could be easily accessed. After a quick test composite, these three passes worked, and I was able to put the reflection pass on a test render of the car with the specular AOV shuffled out and merged using the plus operand.


Unfortunately, after developing this technique, our team decided to use the VDB export/import into Maya based on the recommendations from Sanat and Professor Fowler. So, after having a team meeting with Sanat guiding us on the VDB workflow, I started experimenting with this pipeline so that I could fully understand the steps I needed to take to transfer our FX into Maya.


This pipeline is fairly straightforward in terms of transferring over the physical data. First, I append a convert VDB node after importing the necessary fields from my FX dopnet, and make sure to add all the attributes I need into the Group tab. Then I use a filecache node to export a .vdb sequence. To bring the cache into Maya, I create an AiVolume container and then read the .vdb sequence in from there. Once imported, I have access to all the attributes in Houdini that I transferred in my convert node and can use these attributes to control and AiStandardVolume shader. It is important to note that only the bounding box shows up in the viewport; the volume is only truly visible in the render view window when the shader is assigned.

This technique gets the results we need for FX with relatively simple shaders, such as exhaust. However, with shot050, there is a very dynamic shader specifically on the engine flame. I have experimented with ramps connected to the AiStandard Volume shader to better control the color and emission with less than satisfactory results. While researching, I did find a node called AiUserData, which is often used to transfer over color data from the Cd attribute in Houdini. However, I couldn't quite get these nodes functional, so I believe I need to do more research on that.


The other issue is finding an equivalent for a volume light in mtoa (there is one for Maya, but it is not compatible with the Arnold render engine as far as I can tell), so figuring out a way to further illuminate the engine flames for shot050 will be crucial in the coming weeks. In the worst case scenario, we do now have a fallback pipeline for rendering with Mantra and getting those image sequences to Camilo for compositing.


When submitting to the farm, I knew from previous projects that alembic files required you to manually edit the file paths to the cache using jEdit to make them relative. I figured that a similar technique would be needed for the vdb sequence as well. However, jEdit was having trouble opening due to low memory. After trying to solve this issue through command line to increase Java's heap size with no luck, I used GVIM to open and edit the file path and luckily this worked fine.


As far as my actual FX development, I focused a lot of the burnout of shot 010 since it's such a prominent effect/close to the camera. I handled the main bulk of the burnout by using an attribute transfer between the car's back wheels and the ground plane, then scattering points on the area, feeding them into a popnet, and importing the resulting particles into a separate geometry container to use as a source for the pyro solver.

When cars skid and burn out in this manner, a lot of smoke also accumulates in and around the tire/wheel well. I did try to add this by sourcing a line of points on the tires for a separate pyro solver, however the pyro would ignore the car's collision geometry after about ten frames of playback. I tried increasing substeps, as well as changing the collision padding and static object type (convex hull, concave, volume collisions, and surface collisions), making sure to reset the sim each time with little to no change. I'm still not sure what is causing this, but I was able to hide the issue by decreasing the density of this tire smoke and increasing the dissipation, so it was barely visible. This is obviously not ideal, so I will continue to troubleshoot this issue.

I also did some experimentation with the resizing effect on shot040 very briefly with the car's beauty pass in After Effects using the echo time effect. I think the echo itself is what our team is looking for, however this effect works as essentially a frame buffer, so the highlights and exposure on the car would multiply with the number of echoes. Of course, this is very preliminary, so I will keep developing this. Camilo also has another technique in mind for this effect in Nuke, so he will be developing some tests as well so we have more options to choose from.

Moving forward into Week 6, I hope to have much more refined exhaust tests for shot010 and shot020. As of right now, the FX are on the same render layer as the car in Maya, so I think developing a more intricate render set up with Eaza this week will help give Camilo more control over the FX integration in post. I also hope to figure out how to bring Jie's engine flame into Maya without compromising his current look development he has in Houdini currently.


Here is our current slap comp previs:


bottom of page