- Elizabeth House
- Jan 31, 2022
- 10 min read
Updated: Feb 2, 2022
Description
This project was an exploration of the fundamentals of particle systems in Houdini. To do this, a simple disintegration was assigned to understand an attribute transfer. I decided to disintegrate a snowman and then place it into a snow globe so the disintegration would look like a snow globe when shaken.
Process Breakdown & Troubleshooting
The first thing I did was model all of my assets in Maya, since I felt I could model more efficiently in that software. While modeling, I made sure that any assets that would require a separate texture were their own pieces of mesh since I knew I would be importing .obj files into Houdini and separate meshes are available through groups rather than mesh pieces. After importing and composing my scene, I ran into some issues, the first being that part of the scarf around the snowman’s neck was a blue/purple color. I knew this was back-facing geometry, and was likely a result of using NURBs to model that part of the scarf, so I tried reversing the normals and a clean node and orienting polygons, both of which did not work. I ended up isolating the scarf piece of geometry and making it its own group, deleting the inside faces so the scarf was a surface instead of a solid. Then I used a clean node and turned the reverse winding and orient polygons options, and extruded the new surface to get the original thickness of the scarf without the back-facing geometry.


Once the scarf issue was fixed, I set up my workflow for the disintegration. I did this by creating a simple box above the snowman mesh and keyframed the box downward so that it covered the snowman entirely. I then added a mountain node to the box for noise and assigned a color to it and the snowman mesh (any color works for this technique, so I picked magenta for the box and cyan for the snowman). I then used an attribute transfer, added the Cd (color) point attribute and adjusted the blend width and distance threshold so that a small band of magenta washed over the snowman mesh. I then used a scatter node, changing the density attribute to color and increasing the density scale to be equal to the number of points I wanted to have. I then put a pop network below the scatter node and switched the emission type in the pop source to be all points and to use the first context geometry, which takes the points from the scatter node.


During playback with the default particle network settings to test functionality, my particles were clipping below the ground surface of the snow globe, even though it was set to be a collision object. Originally, I had thought that the intersection of the snowman geometry into the ground plane (since the ground plane was slightly deformed/not flat) was causing the particles to go below the plane and then they would get trapped. So I booleaned the snowman mesh with the ground plane to get the mesh flat against the ground. While this helped a little, it wasn’t entirely effective, as particles were still clipping below the ground. When I turned the guide geometry on, I found that some parts of the ground plane were not being identified as a collision object. The solution I found that best resolved this was changing only the ground plane to use volume collisions, and increasing the division size and offset surface just until the entire surface was covered so no clipping occurred. Once I was satisfied with that result, I moved on to the mesh disintegration.


The disintegration of the actual snowman mesh is a straightforward technique using a Boolean node between the animated box geometry mentioned early and the snowman mesh. However, when I first set up this part of the node graph and tried to view it, my machine crashed. I had run into this problem with the Boolean of the snowman mesh on the ground, but found a way around it by only using the base (body) mesh of the snowman in the Boolean node since it was the only piece of mesh that would be affected. However, this wouldn’t work for the disintegration since all parts needed to disappear. As it turns out, this was a geometry related issue with the pom-pom on the snowman’s hat. Stylistically, the ultra-fuzzy pom-poms was what I was going for, so I used a curve tool in Maya to generate curves on a sphere and applied a paint effect to the curves to convert them to polygons before exporting as an .obj. It didn’t initially cause me any issues when setting up my workflow for the attribute transfer with the particles so I didn’t suspect that it was an issue until trying to Boolean. As it turns out, when I would view the attributes and primitive count of the snowman file with the pom-pom and without, the former was drastically high. So, I isolated the pom-pom group and converted it to a VDB to try and minimize some of the detail in the mesh. I then converted it back to polygons and used two Poly Reduce nodes to minimize the primitive count to about 5% of the original polygon count and was then able to run the Boolean and thus the basic disintegration smoothly.


When merging the particles and deforming mesh together, I got some strange clipping in the front of the geometry with the snowman. All the normals seemed to be fine and a clean node did nothing to remedy this, so I tried packing the snowman geometry and importing it into another geometry container and merging it with a dop import and this solved the issue.


Once I had the basic mechanics working, I wanted to take the disintegration a step further and really bring the snowman to life. I did this by using the POP Curve Force tool and linked a curve that made a pyramid-esque spiral from the base of the snow to the very top. I envisioned the particles from the snowman circling around the house and trees of the snow globe and then exploding at the top, cascading down slowly like snowflakes or the particles in a snow globe do. I liked the pull of the snowman into the curve as it disintegrated, as well as the general effect of the curve force tool, but it caused several issues, the first one being the timing. I found that once I reached a look I liked with the particles, it moved along the curve incredibly slow. After spending a lot of time trying to tweak the spare parameters and the rules in the curve force tool itself, Professor Fowler recommended I use a retime node after importing my particles to merge with my snowman, which worked out great.


Another issue with the curve force tool I had was the suctioning along the curve. In order to get the particles moving along at a relatively fast pace, I increased the suction and follow scale of the curve to be quite high, which in turn squeezed all the particles I had from my snowman into one tiny speck. This was a great effect for the first part of my simulation, but when trying to “explode” the particles out, they would be so condensed it looked like nearly all of the particles had died despite the life expectancy being 100 seconds. I originally had “fixed” this issue by ending my curve with a point that angled straight down so that the particles would just follow the curve and shoot back down. However, doing this resulted in the particles being sucked back into the curve (since the follow and suction scale was so high), resulting in an endless loop of spiraling particles. I then “fixed” this by using an if statement in the suction, follow, and air resistance parameters of the curve force tool to essentially deactivate by the time all the particles reached the top of the globe so that gravity would be the only force acting on them, but they still remained clumped together while falling. Professor Fowler recommended then that I import the frame where the particles are at the top of the globe to a separate geometry container using a file cache node and use that as a source for a separate particle network for the “exploding” particles. I did this and changed the emission type to all points and the source to first context geometry. I then changed the initial velocity to be added to the inherited particles, added some variance in the velocity, and with the addition of a pop wind node, I was able to get the particles to fall in a way that mimicked a snow globe after it had just been shaken.
In order to get the particles to stick to the geometry inside the globe, I used two POP Collision Detect nodes, and set the behavior of the particles to stick when they hit anything on the interior or ground of the globe to minimize bounce and achieve a snow fallen effect. I had initially set the glass of the globe to also be a collision object but had set the response behavior to die rather than something like slide, which was creating a jittering look at the beginning of the simulation since the particles were touching the glass a lot upon activation. Changing the behavior to slide eliminated the jittering but wasn’t giving me the effect I wanted, so I set the glass of the globe to be a static object in this pop net, used surface collisions, and lowered the bounce so that particles would softly bounce off the glass while still falling to eventually stick to the ground.


I then used another dop import node and a retime to slow this side of the effect down. However, when trying to play to see the effect of the simulation, it was incredibly slow. This was because I had a LOT of particles in the second popnet, so I used a pop kill node and enabled the random attribute to randomly kill half of the particles. However, I didn’t notice this making an apparent difference since the globe would always look nearly full with particles. Although it took me a while to realize it, my simulation was taking forever to play because it was continually emitting points. Looking at the geometry spreadsheet, I noticed the pop kill node was working, it just wasn’t enough to counter the number of particles emitted. So, I added an if statement to the impulse activation of the pop source so that the particle emission would turn off after a certain frame, and then changed the chance of the particles killed from the default 50% to 80%. I also used an if statement in the activation parameter of the pop kill node, but set it to turn off much later than the particle impulse activation so that it would kill a large chunk of the particles, but not all of them. When both had turned off, my particle count was half that from the previous version, which was still a lot of points, but it was manageable.
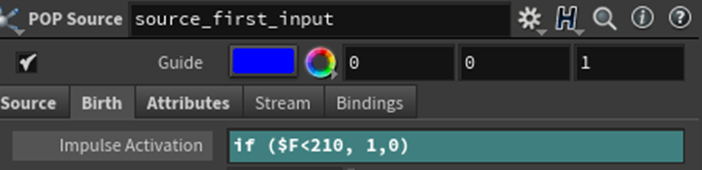

Even though this was manageable on a computer, my renders were still timing out on the render farm. I tried using phantom objects and tiling my renders but the frames of the second simulation were still taking over two hours. With the help of Professor Fowler, I removed the if statement in the activation and replaced it with an expression to set the impulse activation to start at the specified frame, so points weren’t accumulating until the start of the sim. I then deleted the pop kill nodes inside the popnet and instead used a delete by expression to delete about half of my points before they were fed into the particle simulation. This helped run time tremendously and was able to cache just the points in a matter of minutes.


I used another retime node after importing my second particle network so that it would be a bit slower. After caching out both simulations, I needed to instance geometry onto the points. I did this by using a POP Wrangle node to vary the scale randomly and then copying a simple sphere onto the points using a copy to points node rather than my previous POP instance node. The spheres read the point scale and scale themselves accordingly, so I was able to get a nice variation in size. I then assigned a material to the spheres and used a switch node to switch between particle networks based on the frames that they start and merged the switch node output with the packed imported snowman mesh.


From there, I adjusted UVs, added materials and lighting, and went through the process of denoising, adding motion blur, and sampling before starting my render. I did end up using a tiled render, which is a simple checkbox in the output of the mantra nodes, just so I could dually ensure my renders would not time out on the farm. I then made a separate mantra node for each tile for easy access when submitting to the farm.


And here is my final result!
Some little but important things I learned on this project:
1. Instance and pack geometry where you can.
2. When using the dop import node, use the object mask parameter to import only your particles. Leaving this as default will import anything in your popnet, including collision geometry.
3. When importing points from another cache/simulation, set both your emission type to all points and set the impulse activation to start on whatever frame you want.
4. It is best to cache out points only! Do not cache geometry onto the points, apply any meshes after.
5. Using a delete attribute node to delete any unused attributes from imported popnets can reduce cache file size and help with tidiness down the node stream if/when searching for other attributes.
6. Remember to save all materials and shaders in whatever mantra node you use to render your final sequence.
7. Always reset your timeline to the starting frame before saving and exiting a file, especially if things aren’t cached yet to reduce the load/read time of the file the next time you open a file.
8. Triple check your settings both before you cache and before you render (cache files are large).
9. Use explicit rather than constructed naming conventions in the new file cache node.
10. Version up and save OFTEN!
Eventually, I would like to go back and add some more cinematic camera moves and potentially an environment around the globe to give it a stronger narrative and enhance the overall aesthetic. I’d also like to revisit the shaders for the particles and the snow to see if I can get the sparkly effect that snow has when the sunlight hits it. I’d also like to try to render this with Redshift once I learn more about its mechanics, as I tried to use it in one version of my disintegration but unfortunately couldn’t get it to perform the way I wanted, though looking back it was likely the sheer number of points and overall heaviness of my initial simulation before optimizing that caused me trouble. I’m pretty satisfied with the way the particles themselves turned out, but I think I could always regroup the interior mesh so that the particles only stick to the tops of the trees and roof and get a more accurate look. I also think it would be fun to experiment with the same motion but change the seasons and the accompanying effects of the snowman, like instancing leaves to the particles for a fall theme or using a particle fluid surface node for a melting summer time snowman. Overall, I think I gained a lot of knowledge about the functionality of particle systems in this project, and I definitely earned a lot of troubleshooting/problem-solving experience as well.